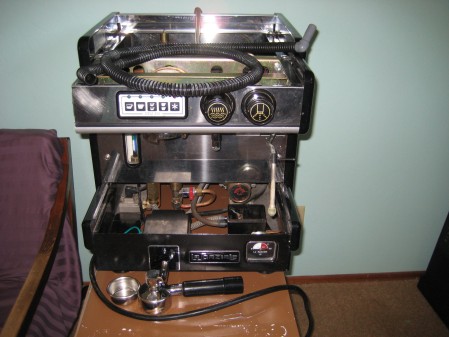
La Spaziale overhaul: the costs of home repair

May 16, 2009

Today’s New York Times has an article on the costs of do-it-yourself home repairs. As I read through the anecdotes of individuals hoping to save a buck by doing it themselves and ending up with a minor (and costly) catastrophe, I kept thinking of my own, painful mistake with the water level probe. Even with the advice of a friend with lots of experience with espresso machines, I still managed to destroy a $200 part (and spend an additional $25 on a part I don’t need). This comes at a time when money is about as scarce around here as dry wood in the Olympic rainforest.

The overhaul continues. I’m waiting for more parts to arrive. For instance, waiting for the water-level sight glass replacement (another casualty of my own hands). Once I get it up and running, I’ll have to run the machine without a water softener for a while until I can save up enough to buy one.


I’ve been getting some helpful repair advice from the Spaziale forum at coffeegeek.com, too.

I’m looking forward to getting the the machine up and running. My Macap/La Spaziale grinder is ready to go, waiting for the fine-tuning on the grind once the machine is operating. Once that is in order, I plan to start creating my own espresso blends from my roasts.

Sumatra Mandheling, next day

May 13, 2009

Roasted coffees change from day to day, true enough. Given all the variables in brewing (method, brew temp, grind, how much coffee you put in), if any of those variables change from day to day, I’m not sure it is possible to say what is different about the coffee from one day to the next. My Sumatra Mandheling is definitely lower-toned and juicier today. But is that because I used less coffee and changed the grind a little? The water temp. could have been a little lower, too (I use a tea kettle just off boil, but sometimes I don’t wait for it to boil, just pour shortly before I think it will start whistling)? Hard to say. Bottom line: this is a mighty fine morning cup, warm or cold!

How you brew makes a huge difference in taste

May 12, 2009

It’s remarkable how much the brewing method influences the taste of the coffee. This morning, for instance, I had two cups of the same roast, a Sumatra Mandheling roasted to FC on Friday night. The first cup was a simple pour-over into a Melitta filter cone with a paper filter (which I always wet first). It was very well balanced, with huge body. A very good cup, but without any remarkable flavors or aftertaste. For the second cup, I brewed the same grind, same roast in a Bialetti Moka Pot. This really brought out the smokiness and the body went from balanced and full to downright heavy-duty. Still fairly clean, but less medium-toned and little more of a bitter bite, more typical of an espresso. Not surprising since the Moka Pot delivers more of an espresso-like cup. What remained consistent with both brews was the enveloping red fruit mild but assertive sweetness that resonates through the cup but fades quickly by the finish where the smoky and earthier flavors emerge in full force.

La Spaziale Overhaul: the $225 mistake

May 3, 2009

As part of my general troubleshooting I carefully examined the machine parts diagrams provided by La Spaziale and compared them with what I have. Looking at the diagram of the boiler, I noticed that instead of this part

water level probe

water level probe

very common on commercial espresso machines (with a single wire coming off of it), I instead had two ragged-looking wires going straight into an open hole in the top of the boiler. Underneath was this narrow, blackened metal stick with a little barrel on the end:

floating water level sensor (shorter piece next to the heating element)

floating water level sensor (shorter piece next to the heating element)

The diagram for my particular model of La Spaziale clearly showed BOTH parts as part of the boiler set-up. These parts are responsible for telling the machine when to turn on the pump and automatically refill the boiler to the correct capacity. Without these parts, the only way to keep the boiler water level accurate was to manually refill the boiler, a difficult and awkward task that would be necessary after nearly every shot poured. Naturally, I thought the first part, the probe, fitted into the part shown above, then screwed into the top of the boiler. The only question was, then, why did I have two wires instead of one?

Now, the replacement part shown above was listed at $197.00 and the part I thought was missing costs $28.00. I was very glad that I did not need the more expensive floating sensor, only the $28 (plus S&H and taxes) probe. When it arrived, however, I could not seem to get the two parts to work together. At that point I should have immediately called the parts store and asked. When I did finally call to ask whether I had indeed received the correct part, it was already too late. I had, very foolishly it turns out, destroyed the $200 part by ripping out the wires together with the silicon that keeps them in place.

When I spoke with the friendly and helpful parts dealer, Marc, who I gathered is the proprietor of Coffee San Marco, I learned that my machine uses one OR the other type of water level sensor, not both. That wouldn’t be so bad if I could just swap out the expensive part I destroyed (after spending hours soaking and cleaning it, too) for the more common and much less expensive probe. Marc told me I could TRY to do this, but it probably would require some reprogramming of the machine (and messing with the wires, something I have very little experience with). I found an internet forum that explained how to reprogram the machine to take the other kind of probe. However, after speaking with an experienced commercial espresso repairman and also asking the individual reputed to be the most knowledgeable veteran of La Spaziale machines in North America, Silvano (of Walnut Creek, CA), I was told that my “newer” year model of this machine was NOT programmed to allow reprogramming from one type of probe to the other and I could ONLY use the $200 type of water level indicator. I was left with the feeling that it MIGHT work, but that I’d be taking a chance and I might even mess with the computer, causing more costly damage. Even to test it out, I would have to strip the wires so I could attach one to the common manual probe and the other to a ground. Then I would have to hold down buttons in a particular manner while turning on and off the machine to reprogram it to accept this type of probe. If that didn’t work, I would have to re-fit the two wires so that I could attach them to the pricey floating sensor. Of course, I also asked everyone whether or not I could just replace the wires and silicon on the my original floating sensor. The answer was a definite NO from all three experienced men. No, the wires must be placed very PRECISELY inside the tube. There is no way to do this at home.

This has been a painful mistake. It may seem silly, but beyond the usual frustration with fuck-ups like this, I let it it get under my skin. This is not a good time for me to be spending nearly $200 (plus other parts) on a hobby. I thought about just leaving it for now, but I’m obviously so involved in this overhaul project that it would be equally frustrating to let the machine sit while I wait for a time of greater financial stability to fork out the dough. I suppose everyone who messes around with stuff, whether it be fixing up cars, bikes, audio equipment, or construction, goes through these kinds of costly trials. I doubt it is very common that the cost is so high, however (except perhaps with car parts or fancy road bike parts).

$197 plus S&H and taxes for this part alone. And I destroyed it!

$197 plus S&H and taxes for this part alone. And I destroyed it!

La Spaziale overhaul continued

May 2, 2009

This is my first experience working with a non-consumer grade appliance. It’s really a different feeling messing around with solid metal parts and as I noted in my last post, it took some time for me to build up the necessary confidence to really dig into the machine and start pulling stuff apart to check, clean, and reassemble.

A turning-point in this process came when I took off the boiler top and scraped off the rotten gasket. This took a few hours of labor of intense scraping with a knife, screwdriver and then sanding to smooth the surface of the boiler in preparation for the new gasket. I soaked it overnight in puro-caff then scrubbed it with a brass brush and sandpaper and it now looks good as new and has a wonderful, heavy feeling in the hand. This is something else I like about overhauling this machine: feeling the clean metal parts in my hands and having a sense of confidence that if I keep it clean like that, it should last forever.

I finally did solve the hot water/infusion valve mystery after I took the advice of two different espresso machine repairmen. The first I called to discuss some parts I had ordered and could not figure out how to use. He advised me to follow the water and take “baby steps” in removing and cleaning everything. The second was the N. California La Spaziale rep, Silvano. He advised me to check the copper tube UNDER the boiler in my continued search for clogged pipes. This is one I had not taken apart yet because it is difficult to get to and because I thought I had figured out that water must be coming from there. No, I don’t know what I had thought, actually. Perhaps I had peered down at the bottom of the boiler from inside and thought there really was no outlet down there (which would not make sense but would check with what I was seeing, which was a completely clogged bottom to the boiler!). Removing this tube required taking off an additional panel on the machine for greater access. There are very few fragile parts on this machine and, of course, I did break a bit of plastic when removing this side panel. It took a while to clean the black guck that was blocking the tube from the bottom of the boiler to the hot water valve (and to the group, I should add), but once I had that done I finally had my hot water dispenser working perfectly.

Still no manometer reading, however.


before...

before...

I must confess, I secretly enjoy cleaning the guck on this machine. For instance, when I took the group gasket off and the heavy shower head piece fell out it was so black I couldn’t even tell it was made thick brass.

after

after

La Spaziale New EK overhaul: troubleshooting

April 25, 2009
top of the boiler

top of the boiler

this is just the cover. I thought I was adjusting the pressurstat by turning this screw!

Once I got the water hooked up, the next step was to try pulling some shots and see how the machine was operating. Of course, I immediately made the mistake of leaving the manual water fill tab open and overfilling the boiler. I had water and steam coming out of every crevice and opening.

Interestingly, however, I noticed that I did not have water coming out of the hot water/infusion valve, although it was definitely open. This was my first indicator that I had blockage somewhere in the tubes or valves.

The next alert signal came from the manometer, which read a steady zero pressure despite having steam zipping out the safety release valve on top of the boiler. In subsequent trial runs of the machine I noticed that despite the manometer’s zero reading I had so much pressure in the boiler that the safety release valve was always in action. This could be due to a malfunctioning boiler safety release valve or the setting of the boiler pressure at the pressur-stat, I reasoned. As it turned out, both were probably true. After some trial-and-error, I saw that my pressur-stat was set to the maximum boiler pressure. I have also replaced the boiler safety release valve with a new one.

Manometer: reading "zero" despite steam exploding out of the machine

Manometer: reading "zero" despite steam exploding out of the machine

To find the block preventing the hot water valve from functioning required that I overcome a lot of hesitation about getting deep into the machine and applying serious force to open up ALL the tubes looking for blocks. I finally did find the block, located in the most difficult to access spot, right under the boiler. After a thorough soaking, scraping and flushing, the hot water valve is now working. Just about every other tube and valve has now been opened and checked for calcium buildup or any other guck that might inhibit the flow or water and steam.

peering down into the boiler

peering down into the boiler

I hesitated also about opening the boiler. Once opened, I saw that I would have to spend several hours cleaning out the old, rotten gasket and sanding the boiler in preparation for a new gasket. Inside at first did not look too bad. I was not looking carefully enough, however, to notice where in fact there was dangerous buildup and blockage (at the opening at the very bottom, and another near the bottom). Learning to “see” the machine and have some understanding of what I’m looking at has been a critical part of my learning curve. Many times I peered down into the boiler and saw a black bottom where there should have been an opening, for instance.

In my next entry I will explain how I misunderstood the La Spaziale parts and design diagrams for my machine and ended up destroying a $200.00 essential part and ordering another $26 part that I cannot use.

La Spaziale New EK overhaul: water

April 24, 2009

After an initial cleaning, my first toward getting this espresso machine operating was to establish the water hook-up. Oh, boy! This was not easy. First, I had to figure out where the machine could go. I considered the kitchen, the laundry/bathroom, and the garage. The kitchen did not have an easily accessible and available water source. I thought about disconnecting the refrigerator water hose and using that line, but then I didn’t have a dedicated 20 amp power outlet available without a massive extension cord running through the kitchen. I tried the laundry/bath and quickly realized there was not enough space. Moreover, of the two outlets in the room, one of them was trigged the fusebox switch as soon as I plugged in the machine. Obviously, that wasn’t going to work. After a week of limbo, I settled on the garage when I figured that I could run a water hose from the gardenhose faucet outside the garage through a vent and into the garage.

The next challenge was getting the right fittings and adaptors to hook up the water. The hose the machine came with was very short, European (metric) threaded, and, I eventually discovered, leaking. After many, many trips to Home Depot and Orchard Supply Hardware, internet surfing and several calls to espresso parts and plumbing supply stores, I gathered that I could use a 3/8″ pipe thread plastic fitting to connect the hose to the machine and I replaced the leaking hose with a standard dishwasher-type hose and fitted that to a potable water garden hose connected to the water source outside the garage.  After dozens and dozens of hours of running around, wrapping fittings in teflon tape only to rip them out a day later, staring at the countless plumbing fittings at hardware stores, and spending at least $50 bucks total (after all the returns), I finally have a water connection for my La Spaziale. In the process I learned a lot about plumbing fittings (how to identify thread types; male and female; the difference between flare and compression; what is a bushing, etc.). I learned that it is much more efficient to go first to the best plumbing supply store in your region. Don’t mess around with Home Depot and the rest because you can’t get reliable help. In my case, the “problem solvers” were Barron Park Plumbing Supply in Mountain View. I had called them early on, but I should have just grabbed my materials and gone there in person right away.

La Spaziale New EK espresso machine refurbish project

April 22, 2009

Not too long ago a generous friend, a sterling fellow named Daniel, gave me a small commercial espresso machine and grinder that had been occupying space and gathering dust in his basement home renovation shop. The machine is a single group, heat exchange single boiler La Spaziale New EK. Made in Italy, this particular model and machine was made in the late 90s. Considering that it is a single group, it is the kind of commercial machine that could serve in a nice restaurant, small bakery, or other business that serves occasional espresso drinks. This particular machine, I’m told, came from a gene-processing company. Apparently the engineers there found it to be ‘too much trouble’ and likely replaced it with a more automated, prosumer-type semi-commercial machine.  The photos at the bottom of this post are of the machine when I received it. I will be adding more photos that document my slow, exciting, sometimes frustrating, process of refurbishing the machine.

img_3177img_3188

La Spaziale New EK single group

La Spaziale New EK single group

Sumatra Organic Roast in the IR2

March 19, 2009

When a friend gave me this Oganic Sumatra coffee to roast, he pointed out that it was “2nd lot” (not sure what that means precisely) and that some of the chaff that lines the beans was knicked and flaking off,  noting to be careful of this when roasting because these flakes will clog my filter and raise the temperature.

How right he was! The first roast I followed my normal profile for a Full City Roast but first crack occurred at 380 F instead of the usual 360-367 F onboard temperature reading. From there the temperature just kept going up and up and it went straight from first to second without passing Go to collect $200. I stopped the roast as soon as I saw, smelled, and heard the arrival of second crack.

For my next attempt I created a new roast profile with much lower temperatures. Here it is:

1) 355 / 3 min

2) 390 / 2:30

3) 425 / 3:30

4) 400 / 2 min

This worked only slightly better. I did get a nice, long first crack at temperatures between 375 and 380 F. However, temperatures continued to rise and I didn’t get as long of a stretch as I wanted before the beans approached second crack. Still, I managed to get what looks like a nice, fairly even Full City +

I’ll try again today with even lower temperature settings. Something like this, perhaps:

1) 355 / 3

2) 380/ 2

3) 415 / 4

4) 360 / 2

I-Roast 2 Updates

March 9, 2009

I’m getting a pretty good feel for the IR2 now. I’m starting to get some consistency from the temperatures + settings (it’s also not as cold out) and have been able to get very close to my target roasts most of the time.

Some temperature updates. A 355 F setting for the first 3 minutes should reach a max of 286 F most of the time. A setting of 400 or even 420 for a few minutes after that should bring the temperature up to 335 F, although I suspect that in warmer weather that will be something in the range of 340 to 357 F. Settings of 450 to 460 get me without fail to first crack, hovering for anywhere from 1 to 2:30 or more minutes in the range of 361 to 375 F.  However, it ALWAYS takes the machine a minute to move to a lower fan and therefore reach first-crack temperatures. This is if the previous setting is below 420 F. It may be different if the previous were set at a higher temperature. Once the IR2 does shift to a lower fan speed it takes very little time, generally speaking, to get in the range of first crack.

Here’s a recent profile that worked nearly perfectly for a espresso blend (Sweet Maria’s Liquid Amber Espresso). My target was a Vienna Roast:

Stage 1: 355 for 3 min

Stage 2: 420 for 3:30 min

Stage 3: 460 for 3:30 minutes

Stage 4: 360 for 2 min

Stage 5: 470 for 2:30 min

Total time: 14:30 minutes

The only thing I will do differently next time is shorten the “stalling” Stage 4 to perhaps 1 minute or 1:30 minutes. I still worry a little about having such a lengthy (to my mind) cool down in the middle of the roast. Although there was no problem in reaching a very controlled second crack in Stage 5.

I’m drinking a cup of Costa Rican RIP (roasted in parchment) “Red Honey”. It tastes like soap! I don’t know why. The cup had soap residue? The beans are old? Roasted too dark?